NYE everyone! I hope everyone is planning on doing something really fun and being safe. I've decided to go completely out of my comfort zone and wear a short dress and high heels. I'm 5'9" and I'll be wearing 4 inch heels. That will put me at a whooping 6'1"! This should be interesting. :)
Anyways, 2010 has been an "eh" year. I accomplished quite a few goals, such as going to Esthetics School, starting my own makeup channel, but I want 2011 to be the year of creativity. I want to work more on my channel and make great videos. I would also love to find a job that allowed me to be creative at work and express my individuality. I'm excited for the prospects. I also heard back from an animal rescue in my area and they would like me to volunteer. I think that would be an amazing experience and extremely fulfilling.
The one thing that I want to happen in 2011 is see my dad's amazing green energy idea come to take off. That's my New Year's wish! :)
I hope you all have a wonderful night and behave yourself!

Friday, December 31, 2010
Friday, December 10, 2010
Beauty Isn't Just Skin Deep
We're all worried about how we look on the outside. How our hair looks, how our makeup looks, how our car/house/bank account looks. The reality is, that's not what makes us beautiful.
We all know this, but we are such visual creatures we can't get over it. We've all seen the really beautiful guy/girl walking down the street. As soon as they open their mouth they have something mean/nasty/rude to say. We don't automatically put them in the ugly category because they're mean, but that's right where they belong.
What I'm trying to say is that the most beautiful part of a person is their attitude. A positive, pleasant attitude is beauty. We are attracted to beauty, and unfortunately our eyes sometimes play tricks on us.
What I'm trying to say is remember to have a beautiful attitude! :)
Thursday, December 9, 2010
Beautiful Holiday Look Using Inexpensive Products
Yay for quality inexpensive products. I was pleasantly surprised when I picked up the Sugar Plum Fairy Special Edition Coloricon Eyeshadow Palette and Eyeliner at the drugstore. It was only like $3 something. I have been using this eyeshadow like crazy. I have been wearing it everywhere. I would recommend this collection to anyone. It would also make a great stocking stuffer! Unforunately, I didn't check out any of the other holiday palettes they have. I bet they are just as great. Have you tried them?

The lip colors I used in the tutorial are also some of my favorites for this season. I wanted a bold lip, but nothing too overpowering. I tend to stick with nude and subtle shades. If you're like me, you have to gradually work your way into confidently wearing bright colors on your lips. If you're a lip-color-lover then by all means, go bolder! I used a combination of Maybelline's Color Sensational Lip Stain in Blushing and Buxom Lip Plumper in Kandi.
Wednesday, December 1, 2010
Skin Care Question and Answer #1
Hey everyone! Thanks so much for all the feed back! I got so excited about the comments people had left, that I ended up answering them immediately. I will work on doing some of the backlogged questions. That will keep me very, very busy! :)
Question 1
"how do I control all that oil on my face?
I've tried matte moisturizers, blotting paper, and primers that promise to reduce shine. But half way through the day, my face always end up a mess.
I don't wear any foundation or any "skin makeup" and I sorta have combination skin where some areas get actually quite dry!
Will laura mercier's translucent powder work to absorb the oil?
Thanks for doing this btw!"
First start off by looking at your diet. I think we all forget that we are what we eat. Sometimes we eat in excess and don't really realize it. I'm a total sugar nut and I just can't help myself. I love sweet things. I try to cut back, but sometimes those brownies just call my name! Anyways, the sebum (oil) that comes out of our pores is good, but excess can lead to breakouts and it might be trying to tell us something. I'm not a dietitian, but I'm saying you might want to examine your diet.
The next step would be to look at your cleanser. Are you using something harsh, that leaves your skin feeling squeaky clean and tight? If so, your skin is overcompensating for being stripped. Try a gentle cleanser like Cetaphil for All Skin Types or Philosophy Purity Made Simple. This are both pretty inexpensive and won't strip your skin.
A clay mask twice a week will also be beneficial. Only use it in areas that you have having oil breakthrough. You don't want to dry out dry patches even more. My favorite clay mask is St. Ives Firming Clay Mask. It's cheap and works wonders! :)
Continue to use the mattifying and oil-free moisturizers. Also adding a translucent powder will help! It doesn't matter the brand, but make sure you find one you like!
Like I said in the video, you might find that you break out when you switch cleansers. This is normal and give your skin a few weeks to adjust. Keep me posted. I hope this helps!
Question 2
"do you know of a good cheap moisturizer from the drugstore,that is light and for acne prone combination skin ? I have bad luck with moisturizers breaking me out and don't want to spend very much on them in case it doesnt work for me"
There are a lot of great options at the drugstore. I think the biggest challenge about shopping at the drugstore is that you're supposed to know what you need. It's easier when you go to an Esthetician and someone says, "this will work for you."
- Moisturizing Lotion for All Skin Types from Cetaphil is probably the cheapest and most recommended. It's a often recommended by dermatologists and it comes in big sizes. It's light and something that says it's for all skin types is good for combo skin. $8-$12.
- Oil Free Moisture from Neutrogena is another great option, it's a little bit pricier for what you get, but Neutrogena makes really nice products. You can also get this one with or without sunscreen.
Question 3
I have a question! Whenever I get a pimple, the mark thats left there as a result takes weeks to heal on my face. I usually resort to using neosporin to help the process along, but is there anything I can use to heal up the leftover mark/scab faster? (yes I am a picker! I know thats my first mistake)
Ah, I can speak till I'm blue in the face about picking, but we all do it. So, a pimple is actually a wound in you skin and it can take up to 6 months for it to fully heal. If you are continually getting pimples in the same area, it may never heal. If Neosporian is working for you, you should continue to use it. That's what it's for, healing the skin. There are other options, such as, honey, Aloe or lemon juice and apply an ice cube for a 10 to 15 minutes a day.
I hope that these suggestions help! Please continue to submit your questions! :)
Saturday, November 27, 2010
Friday, November 26, 2010
Skin Care 101
We get skin care advice everyday. From magazines, TV, friends, youtube, our parents, siblings... Anyone and everyone can be an expert on skin care. The reality is, everyone isn't. The skin is an organ of our body and very complicated and complex. Most of the time ailments such as eczema, acne and dermatitis come from within. Our skin is able to tell us that something is wrong from within. You can have a hormonal imbalance, being eating too much refined sugar, salt or fat, or even a reaction to a medicine and your skin will show it. We don't always associate these problems with internal issues, and try to fix the problem topically, instead of from within.
Getting advice from someone who doesn't have a deep understanding of the skin is bad news. There are a lot of misconceptions out there that can actually be terrible for our skin.
I'm not an expert by any means. Do I have a deeper understanding of the skin than most people? Of course I do! This is my career field. I look at and touch skin all day long. I can give you advice until I'm blue in the face, does that mean you will follow it? Not necessarily. Whenever anyone asks me about their skin, they are looking for a simple solution to a very complex problem. There is no such thing as hope in a jar. There is no 3 step program that will cure every single person's acne.
Most of the questions I get on here are about acne. What products should I use? How do I get rid of it? I eat right, I change my pillowcase, why isn't this working? I don't know. I can suggest things you can do, but it's really a guessing game. An educated guessing game. Unfortunately I can't see your endocrine system and tell you what's wrong. We don't have an on-board diagnostic system that reads out exactly what's wrong with us. We should and maybe someday science will bring that to us, but we don't.
What causes Acne?
Acne is such a complex problem and there are quite a few factors that play into it.
1. Our Endocrine System: This system controls our hormone levels and determines the amount of sebaceous activity our sebaceous glands will have. Our sebaceous glands/hair follicles are what we call pores. Sebum is a fatty solution that is secreted by our "pores". It is used to lubricate the hair follicle and keep the skin from drying out. Sebum is NOT bad. Too my sebum secretion can lead to oily skin and breakouts. Our skin classification, oily, dry, normal or combo is referring to our sebum production.
2. Resident Bacteria: We hear all the time about products that kill bacteria and spa treatments that kill bacteria. We're always out to kill the bacteria! Kill the bacteria. Well, to be honest our skin is part of our immune system. It is our first line of defense against bacteria that are airborne, on surfaces and such. We have bacteria that already live on us. Sometime we pick them up elsewhere, but our resident bacteria live on our skin. Our skin is slightly acidic so they aren't able to overrun us take over our bodies. Anyways, a certain breed of bacteria, Propionibacterium acnes to be exact, lives on our skin and loves to eat our sebum. Yum. This little guys can get into our "pores" and cause an infection. This triggers an immune response and a lovely pimple is formed. Picking and popping pimples is horrible for your skin. You're basically picking at an infection. This can lead to scaring and hyper pigmentation. It actually takes the skin longer to heal if you pick at the pimple. You can also make the infection worse by picking. You can track more bacteria onto your skin... this could lead to staph infections and even MRSA. Be careful.
3. Retained Skin Cells: We are constantly making new skin and about every 28 days or so we have new skin at the surface. The top layer is supposed to shed and slough off naturally and most of the time it does. Sometimes it doesn't always do what it's supposed and that is why exfoliation is so important. If your skin is producing too much sebum and the resident bacteria are living off it and you add dead skin cells that trap the bacteria to the skin, you're just asking for a pimple! Retained skin cells can also lead to white heads. Now, this doesn't mean you should go an exfoliate everyday. Exfoliating everyday is bad because those dead skin cells are still important. I know this is confusing. Those cells bind water to our skin. They play an important part in the moisture of our skin. Over exfoliating can cause excess sebum production and dehydration of the skin. Only exfoliate 2-3 times a week.
My skin care routine is relatively simple. I wash my face once a day. Most people can get away with this, but washing your face twice a day with normal/oily skin is okay. If you have dry skin you might want to dry washing your face once a day, preferably at night, so that you aren't stripping you skin.
Step 1. Hand Washing: This might seem kind of silly, but the first product I use is a jarred product. I always wrap a tissue or a cotton round around my finger so that I don't actually put my fingers in the jar. Hand washing is mostly a precaution.
Step 2. Makeup Remover: I use plan old Pond's Cold Cream to remove my makeup. It's gentle and doesn't irritate. I can use it on my whole face and my eyes. Versatile and cheap. What's not to love?
Step 3. Cleanse: Cleansing is important to remove daily build of grim, dirt, pollutants and excess oil. It's important not to strip your skin so I recommend that ANYONE could us a product like Cethaphil. It's gentle and cheap. I think cleansers are a HUGE waste of money. They stay on your skin for what, 20 seconds? Think about it. I just use the generic brand of Cethaphil from Target. Remember if you are looking at a generic product, make sure to check and make sure the ingredients match word for word.
Step 4. Exfoliate: I use the Dermalogica Daily Microfoliant to exfoliate on a twice weekly basis. I really hate that they say a product that is used to exfoliate the skin can be used everyday. Shame on your Dermalogica. Shame on you. I really do like this product because it has Salicylic acid in it as well as gentle enzymes so it is not too harsh.
Step 5. Toner: Toner is not a product that we need. It was originally created to balance the pH of the skin after we used harsh cleanser. Now most cleanser we use aren't stripping our skin, or at least you shouldn't be using one! Like I said in the video you just need to have damp skin when you put on your cleanser.
Step 6. Moisturize: This is by far the most important step and should never be skipped. You should choose a moisturizer that is appropriate for your skin and your climate. The weather needs to be factored into your skin care routine. I typically use a lighter moisturizer in the summer and a heavier one in the winter. Make sure you wear sunscreen all year long regardless of season or the amount of sunlight!
Thursday, November 25, 2010
Happy Thanksgiving!
I hope everyone is having a wonderful Thanksgiving.
I, like everyone else, would like to take a moment today and remember what I'm thankful for.
First off, my family. They are the most amazing people EVER! My parents are such fun, supportive and smart people that I can't imagine my life without them. I'm thankful they are always there and love me as much as they do! I'm thankful that my broski and I now live close enough we could see each other everyday. He's a great person, he's fun and he's so smart. I love him so so so much! My aunt and uncle. My second set of parents. They are always there for holidays, birthdays and just when I need them. I love them very much!

My boyfriend and bestest friend! I love having him in my life to make hard decisions with and to snuggle with. He's the most amazing man a girl could ask for. I'm not quite sure how I got so lucky, but I'm thankful for having such an intelligent, sweet, caring, loving partner by my side. I'm thankful that we have stuck it out for this long and still have fun together! Many more Thanksgivings together? I think so!

My best friend, Betsy. Thank you for always being there for me. You're a true friend! I love you dearly!
My puppy. Ah, Kona. How I love you. I'm so thankful I found you and brought you into my life. You bring so much joy and companionship. I'm thankful you're always there for a hug and a kiss. Without you life just wouldn't be so exciting. I'm also thankful that you will let me dress you up in ridiculous outfits. Love you boo boo bear.

Maureen. The most amazing teacher I've ever had. Not only is her head filled with so much knowledge, but she loves to share it and will explain it until you know it backwards, forwards and sideways. She always had a kind word and is there to give you that confidence that you need. Thank you for always believing in me and my classmates.
I'm also thankful for the heater in my bathroom, the beautiful snowstorm we just had, my cozy bed, comfortable shoes, chapstick, moisturizer, mascara, brownies/ice cream/candy, fashion magazines, mittens, electricity, earrings, photography, running water, clean water, vacuum cleaners and the roof over my head!
Happy Turkey Day Everyone!
Tuesday, November 23, 2010
Where Has All the Inspiration Gone?
Today I had a snow day. No schoooooool! Yay! Seattle is an ice skating rink. It's ridiculous. I'm from Idaho so I'm used to snowy winters, but Seattle is a different story. It snows so infrequently here that at the mention of snow people start driving off the roads. With all the hills and such here it's a scary place. I will be walking everywhere until everything melts and things go back to normal.
As much as I love the snow, it's hindering our ability to go home for the holiday. We decided that we are not going to risk getting stuck on the mountain passes. I still haven't completely wrapped my head around this idea, because I was looking forward to seeing my parents and my bestest friend. Maybe we will check the weather one last time tomorrow and see how things are.
Anyways, back to what I was going to talk about... Oh, and the heater in my living room broke. #*&%#@!@#$! Yep. It's 20 something degrees and the heater took a big poo. Thank you heater! :)
Okay, ready to focus. I woke up thinking that I would just make video, after video, after video today. My doggie and I put on our snuggies and decided that we would make a tag video, I made the video and now I don't feel like posting it. I made a tutorial... Don't feel like posting it. I haven't done any looks that I really love. I like what I'm wearing, but I need some inspiration! Someone please help!
Sunday, November 21, 2010
Cocktail Hour - UV Free Tanning
Join us for a drink! The drink we made tasted just like a peach! Yum! This recipe will make enough for two small drinks.
1 shot of Absolute Peach Vodka
1 shot of Peach Schnapps
1 cup of sparkling water
and a splash of V8 Splash Peach Mango Juice
I love that sunkissed glow, but I'm terrified of the effects UV radiation has on my skin. It causes skin cancer and premature aging. I went tanning in a tanning bed for about 6 months, once a week for about ten minutes each. I actually got sunspots from that time in a tanning bed. Since then I have stopped spending a lot of time in the sun and have never set foot in a tanning bed since. I'm not sure what motivated me to go tanning in the first place. All through high school and most of college, I was the queen of anti-tanning. I told my friend they were going to die and look old. I was a broken record. Then I got tired of being the pasty girl in all the pictures, etc. I had a big event coming up that required a cocktail dress and figured tanning was my only option. Well it wasn't, but I thought it was.
Nowadays there are so many options for UV Free Tanning. It's awesome. Formulations for self-tanners have improved greatly. My favorite by far is an airbrushed tan. An experienced technician can make you look like you just got back from a tropical vacation in less than 5 minutes! Be sure to check out my video all about your options. I talk with Chardae, my friend and fellow Esthetician, who operates her own tanning studio out of her house.
When looking at UV Free Tanners, you want to make sure the active ingredient in the product is Dihydroxyacetone or DHA. DHA reacts with the amino acids in your skin and changes the color of your skin. Unlike, say bronzers, it's changes the color of the skin instead of adding color on top of the skin. Most selftanners you can buy at the store will use this as their main ingredient. I would recommend it being one of the top 3 ingredients if you are looking for immediate results. If you are looking for a gradual tan, having it listed as the 5th or 6th ingredient is just fine. I really like Jergens Natural Glow Daily Moisturizer for a gradual tan. DHA is listed as the 4th ingredient The L'Oreal Sublime Bronze Luminous Self-Tanning Lotion is awesome for instant results. DHA is listed at the 3rd ingredient.
There has been some research that sunless tanners can increase free radical activity in the body. I would recommend getting plenty of antioxidants both internally and externally when using self tanning products! :)
Happy Tanning!
*If you are under the legal drinking age, don't drink. Just have V8 Juice with some sparkling water. Please drink responsibly.
Monday, October 18, 2010
Natural Look Using Bare Escentuals Eye Shadow
Hey Everyone!
I just uploaded my latest video! I was really excited to do this look, because it's a look anyone can wear. It's perfect for young and mature skin.
Watch it HERE!
I just uploaded my latest video! I was really excited to do this look, because it's a look anyone can wear. It's perfect for young and mature skin.
Watch it HERE!
Sunday, October 10, 2010
Autumn Inspired Look
Autumn is one of my favorite times of year. I love all of the fun activities and the colors. This look was inspired from a trip to the pumpkin patch. You've got corn, pumpkins, gourds, leaves changing colors, the dirt... it's all so beautiful!
I wanted to create a look using these colors, that was simple and you could wear to the pumpkin patch or whatever Autumn activity you're doing. It only takes a few minutes to do this look. Plus if you have blue eyes, it will make them pop!
I will walk you through the steps, or you can watch the video here
Start with primer if you chose.
Then take your NYX Jumbo Eye Pencil in Milk and put it all over your lid. Do put it on the inner corner of your lower lash line. This will be the base for the colors, mostly yellow. It's important that they stand out as colors and don't make you look sickly. When done incorrectly, yellow and orange can make you look sick.
Start by defining your crease. It's best to do this first when working with such light colors. This requires a dark brown shade. I used the Bare Escentuals Light Stroke brush. It's much like their Max Coverage Brush.
Next, apply your yellow shadow to your inner third and onto the lower lash. Use any eyeshadow brush to pat it onto the eye.
Now, Apply the lighter brown shade to the outer corner. This doesn't have to be perfect. I used my Precision Eye Brush (they eyeshadow brush end). Make sure to only use one side.
Lastly, pat orange into the middle third of your eye. This is right above the iris and will make blue eyes stand out. I used to the other side of Precision Eye.
Now, highlight you brow bone and under the eye. Then using a fluffy blending brush, carefully blend the colors on your eyelid together.
Curl your lashes and apply mascara and you are good to go! :)
Saturday, October 2, 2010
Welcome to Cocktail Hour - The Basics of Foundation
Who doesn't love having a drink and talk about beauty with a girlfriend. Cocktail Hour is going to be the latest segment, that will always feature a guest. Nobody likes to drink alone. And you shouldn't.
The Recipe
3 cups Simply Orange Juice with Pineapple - best juice ever!
1-2 shots Meyers Dark Rum
1-2 shots Cruzan Coconut Rum
A splash of Triple Sec
Ice
Blend together. Add ice to glasses and pour. This will make enough for 2 to 3 girlfriends to have a nice evening cocktail together!
This episode we discussed Foundation. I know a lot of people are really intimidated by choosing a foundation. It's hard! I have had a really hard time matching people and it's frustrating. Sometimes you have to mix two colors together to get the right color, but who wants to buy two foundations. It's good to pick a line that has lots of colors to choose from.
Figuring out your undertones is pretty simple, just have to look at the whole picture. Look at the undertones in the basis of pink, yellow or neither/both. What do you think you have? Olive tones fall into the warm category.
It's strange to me that sometimes when I pick out foundation, I'm a cool with one line and a neutral with others. Sometimes it's their formulations and sometimes it's you. Sun exposure can alter the undertones present. Remember you best anti-aging tool is sunscreen, so wear it, but if we spend lots of time in the sun in the summer or year round, it's going effect our undertones. That's totally normal.
Picking out the right color is tricky and if you are somewhere in the middle always go with the lighter shade. You can always add bronzer, but if you have a shade that's slightly too dark for you, you won't be able to wear bronzer because your face and body colors won't match. If you find a shade the disappears completely on your face, that is the color for you. You don't want to see the color. Foundation is supposed to make you look flawless, not like an Umpa Lumpa, unless, of course, that was the look you were going for!
Keep in mind that you should drink alcohol in moderation. It dehydrates your skin and aggravates Rosacea. Do not drink if you are under the legal age limit. Never, never, never drink and drive.
If you have any question, comments, concerns and/or requests, please let me know!
Watch the video here!
Cocktail Hour - Foundation
Sunday, September 26, 2010
Party Hardy!
So, you stayed out way too late and had too much to drink. Oops.
We’re going to make you look like a million bucks when you only feel like $250K.
Water – You’re dehydrated and it’s showing in your skin. Hydrate and not only will you feel better, but you’ll look better too.

Breaktfast - Eat a balanced breakfast. Eggs, fruit and whole grain toast is a great option, if you have the time. If you don’t, a protein bar, like Luna Bar Blueberry Bliss ($1.50, Grocery and convenience Stores). These are delicious, quick and packed with protein and vitamins.

Exfoliate – This Pevonia Spa Teen Blemished Skin Cleanser ($22, shoppevonia.com) is a wonderful exfoliant. They are idiots for calling it a teen product. It can be used by anyone. It has a physical, Micronized Walnut Powder, and chemical exfoliant, Salicylic and Lactic Acid, to make your skin look radiant and brand new. Plus, it has a fresh citrus smell that will wake you up!

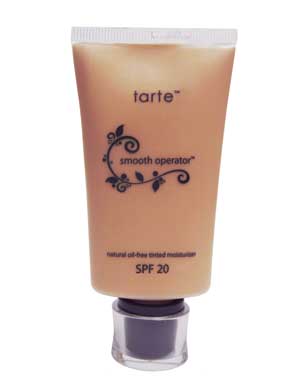
Moisturize – Use an oil-free tinted moisturizer to make your skin glow. The Smooth Operator Tinted Moisturizer from tarte ($36, Sephora.com) is an excellent way to moisturize, protect and invigorate your skin. It has sodium hyaluronate which binds moisture to your skin. It has antioxidants and extracts like chamomile that soothe and reduce inflammation. For an extra glow, mix Clinique Up-lighing Liquid Illuminater ($22.50, Macys.com) into your moisturizer before you apply it.

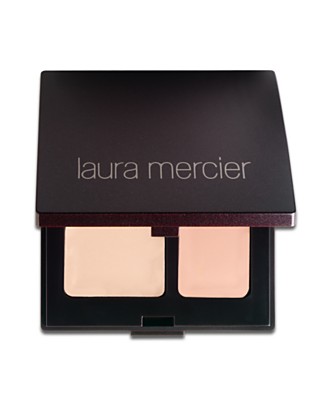
Conceal – Conceal those undereye circle easily with this duo from Laura Mercier. The Secret Camoflouge ($28, LauraMercier.com) comes with two colors so you can easily mix together the right color. Use your ring finger to blend into the eye area. This will warm the product and make you look like you actually got your 8 hours of beauty sleep.
Blush – This will bring back your natural flush. Try Covergirl’s Cheekers in Pretty Peach ($5, drugstores) to get a nice, soft glow. Make sure to smile so you can easily find the apples of your cheeks.

Lip Stain – This is the easiest way to get hassle-free color. Stila’s Lip and Cheek Stain in Cherry Crush ($24, Sephora.com) is a sheer berry red. This product can be used on your lips or cheeks or both. Yay, for multipurpose products!

We’re going to make you look like a million bucks when you only feel like $250K.
Water – You’re dehydrated and it’s showing in your skin. Hydrate and not only will you feel better, but you’ll look better too.
Breaktfast - Eat a balanced breakfast. Eggs, fruit and whole grain toast is a great option, if you have the time. If you don’t, a protein bar, like Luna Bar Blueberry Bliss ($1.50, Grocery and convenience Stores). These are delicious, quick and packed with protein and vitamins.
Exfoliate – This Pevonia Spa Teen Blemished Skin Cleanser ($22, shoppevonia.com) is a wonderful exfoliant. They are idiots for calling it a teen product. It can be used by anyone. It has a physical, Micronized Walnut Powder, and chemical exfoliant, Salicylic and Lactic Acid, to make your skin look radiant and brand new. Plus, it has a fresh citrus smell that will wake you up!
Moisturize – Use an oil-free tinted moisturizer to make your skin glow. The Smooth Operator Tinted Moisturizer from tarte ($36, Sephora.com) is an excellent way to moisturize, protect and invigorate your skin. It has sodium hyaluronate which binds moisture to your skin. It has antioxidants and extracts like chamomile that soothe and reduce inflammation. For an extra glow, mix Clinique Up-lighing Liquid Illuminater ($22.50, Macys.com) into your moisturizer before you apply it.
Conceal – Conceal those undereye circle easily with this duo from Laura Mercier. The Secret Camoflouge ($28, LauraMercier.com) comes with two colors so you can easily mix together the right color. Use your ring finger to blend into the eye area. This will warm the product and make you look like you actually got your 8 hours of beauty sleep.
Blush – This will bring back your natural flush. Try Covergirl’s Cheekers in Pretty Peach ($5, drugstores) to get a nice, soft glow. Make sure to smile so you can easily find the apples of your cheeks.
Lip Stain – This is the easiest way to get hassle-free color. Stila’s Lip and Cheek Stain in Cherry Crush ($24, Sephora.com) is a sheer berry red. This product can be used on your lips or cheeks or both. Yay, for multipurpose products!
Friday, September 24, 2010
Taylor Momsen, Rock Chick Inspired Look
I had so much fun doing this look. I don't typically wear really heavy makeup. I normally just wear a nude base color, a brown crease color and a highlighter, so wearing black is really fun for me! I went around town all day and was in such a good mood because I loved my look! :)
This is a super easy look that doesn't take too much time. It does take some patience because it can be a little messy. I would recommend trying it out once before you try to wear it somewhere.
I don't really know much about Taylor Momsen other than her eye makeup. I had no idea she is only 16.
Primer - Start with your Primer (DUH). A Primer is really important when you're doing extreme colors. It's not always important for daily wear, but I recommend it for this look. Use your fave!
Crease - Dark Brown - Coastal Scents Palette - Starting with your crease ensures that it will be defined properly. Using a soft brown creates an easy transition between the black and your highlight color. This is really important. It will also give you a nice outline when applying the black eyeshadow. Use your favorite crease brush. I got mine at Target!
Eyeliner - NYX Jumbo Eye Pencil - Black Bean - I love these eye pencils from NYX. They're really cheap. I got mine at Ulta and all the NYX cosmetics were buy 1, get 1 50% off. Heck yes! Let it dry before you open your eye, or you will end up with a mess! You don't have to be precise with this. You line can be messy, just like mine in the video, because we will be blending it anyway.
Base Color - Black - Coastal Scents Palette - This black is the basis for this look. I'm using my BareEscentuals Precision eye brush. I love this brush, but you could use any eyeshadow brush. Make sure you stay on your lid and blend really well. This part can take a while, so go slow. It's better to go slow because you will make less mistakes and won't have to spend a lot of time correcting.
Silver Metallic Color - Coastal Scents Palette - Choose the color that is right for the look you want. This color will give you the metallic sheen. Apply layer after layer until you get the desired effect. You don't necessarily have to do this, but it gives this look a more elegant feel. If you want just a matte black look skip this step.
Highlighter - Covergirl Shimmering Sands Trio - Lightest Color - I love this highlight color and this Trio. I actually use it on a daily basis. It's really inexpensive and the light color is my favorite highlighter ever. I used my smudge brush (which I also got at Target) to place the shadow more precisely. I typically use my fingers for highlighter, but it was important not to smear the black, I recommend using a tightly packed brush to place your highlighter.
Eyeliner on the Waterline - Covergirl Perfect Point Eyeliner - Black - You can use whatever eyeliner you want. Black is the best color. A waterproof liner is another idea. I like the Le Stylo Waterproof from Lancome. If you plan on spending all day in this makeup, waterproof is ideal. The liner doesn't have much to adhere to when you place it on your waterline. Make sure you DO NOT share eyeliners with friends and family if you place it on your waterline. It's important to clean it with alcohol each time you use it to avoid eye infections.
Lining the Lower Lash Line - I used the other end (pointier end) of my precision eye brush to place my black and metallic gray/silver color along my lower lashes. Make sure you blend really well so there are no gabs between your lash line and waterline.
Curl you lashes, apply a black mascara of your choice.
Add a highlighting top coat. I used the Max Factor Vivid Impact Highlighter in Blazing Black. I choose to use a fun topcoat color to add a pop of color. Whenever I wear this mascara it will catch people's eye and they love it.
Wednesday, September 22, 2010
Coastal Scents 88 Color Palette
I finally broke down and bought one. Everyone on youtube seems to love them so I thought I would buy one. I really like mine and think that I will be able to create some really fun looks. I look forward to sharing the looks that I create with you.
Tuesday, September 21, 2010
Simple Matte and Conservative Look
Thank you to everyone who is subscribing and giving me positive feedback for my videos. :)
The look I did today is a really basic look. It is quick, easy and can be done with any number of colors. You can dress it up, dress it down or any way you like. I wore the look around all day and got lots of compliments.
I did want to include a picture of my Sephora Palette so it's easier to know which colors I used. I hope this helps make it more clear.

I would encourage anyone who is new to makeup or looking for a simple way to spruce up their makeup collection, to purchase some sort of palette of multiple colors. My Sephora palette only cost me $30 and has given me endless amounts of looks. It's really worth the money. The best way to guarantee that inexpensive eyeshadows will have a rich pigment, eye primer. You don't have to use a primer every day, but if you want to use it for special occasions it's worth it!
So what should I look for in a primer!? Silicone, Silicone, Silicone. Most primers have either Cyclopentasiloxane, Dimethicone, or some form of Silicone. You want to make sure it's in the top 3 ingredients of a product. Here is some information I found about Silicone products used in cosmetics.
Silicones are used as emollients (skin softeners), as lubricants, as thickeners, and as volatile liquids that make coatings feel smooth, but evaporate without leaving a greasy residue.
Highly cross-linked silicone films are used in cosmetics to form films that absorb sebum (skin oils) and prevent shine.
Cyclopentasiloxane is a low viscosity, volatile liquid used as a carrier. It lubricates, and prevents hair sprays from being sticky to the touch. It evaporates completely, leaving no residue.
Dimethicone is another name for polydimethylsiloxane and is used to impart a soft velvety feel to hair or skin products. It is also used as an emulsifier for "water-in-oil" emulsions.
Trimethylsiloxysilicate is a film forming resin, used to keep hand lotions and sunscreens from washing off.
Cetearyl methicone is a polysiloxane wax. It replaces petrolatum in products such as hand lotions to give them a non-greasy feel.
source : http://sci-toys.com/ingredients/dimethicone.html
Monday, September 20, 2010
Quick and Easy Flawless Face
Hey Everyone!
I just added the latest video to youtube! It's all about flawless skin!
I did this tutorial because I wanted to share with everyone how quick and easy mineral makeup is. I really love mineral makeup for a few reasons.
1. It's natural.
2. Titanium Dioxide and Zinc Oxide are natural sunblocks. They physically block the sun, while other chemical sunscreens just absorb.
3. It gives your skin a flawless look in just a few strokes. Some require a lot of buffing, but it's not as messy as liquid.
4. It won't clog your pores.
When you're looking for a mineral makeup, price is definitely a factor. I know it can be expensive, but remember you get what you pay for. I prefer to splurge on mineral foundation as opposed to eyeshadow and other products because those are a dime-a-dozen. I can find quality eyeshadow for $1 to $100, but when it comes to mineral foundation the pricier stuff tends to be better.
I always recommend Bare Minerals as a place to start. It is relatively inexpensive and commonly available. You can even order one of their starter kits from Sephora.com for about $60. This typically includes 2 different foundation colors, so you can get the right color, warmth, and mineral veil. The kits also include a few brushes. The brushes are good quality. That is what I did when I first started using mineral makeup.
I found out about Jane Iredale when I started working at a spa that carried it. Her powder foundations are great and often recommended by dermatologist. Her powders and her quad bronzers, Sunbeam and Moonglow are really the only products of hers that I believe stand out. I think that her liquid products, like Dream Tint and her Liquid Minerals, have a funky smell! :)
The products used in this video :
Neutrogena 3-in-1 Under-eye Concealer - Fair - It's a creamy texture and has some yellowish undertones to help cover the blue/purple colors under your eyes. This isn't mineral based, but it's a nice product.
Jane Iredale Amazing Base Loose Powder - Ivory - This is a wonderful foundation that also doubles as a concealer. In the video I use a concealer brush to cover up any distractions. Then I use a kabuki brush to cover my whole face. Remember when using mineral powder, or any powder for that matter, you want to go in a downward motion. This downward motion is very important because of the vellus or baby fine hair on our face. That hair grows in a downward direction. Basically follow the direction of hair growth!
bareMinerals Warmth All Over Face Color - I use this as a bronzer. It creates a warm glow and helps bring life to one's face. I use the "3" motion to apply it to areas the sun would naturally hit. We want to fake our sun exposure! I used bareMinerals Full Flawless Face Brush to apply it.
bareMinerals Blush - Hint - This color has pink warm shades. It's a nice blush almost anyone can use. I applied it in a downward and upward motion. Always smile when you are looking for the apples of your cheeks. It's the best way to find them and smiling is always good for you! :)
Tuesday, September 14, 2010
First Video Up!
Hey everyone!
My first tutorial is up and running. I'm really excited to have started this new adventure. I hope my tutorials are helpful and I'm looking forward to getting requests and hearing what you think.
I'm going to be launching a Halloween Tutorial Special for you all soon. Look for it at the end of the month. If you have any requests for your costume please feel free to contact me. Sending pictures and links are always helpful!
Thanks so much for watching.
Kimberly
Subscribe to:
Posts (Atom)